
When it comes to installing outlets in your Plymouth, MA home, safety and compliance are key. You’ll want to familiarize yourself with local codes and select the right type of outlet for each area. Gathering the right tools is essential, too. But what’s the best way to guarantee a smooth installation process? Let’s explore some pro tips that can help you navigate this task effectively.
Understanding Local Electrical Codes and Regulations
When you’re planning an outlet installation, it’s vital to understand local electrical codes and regulations, as they dictate the standards for safety and compliance in your area.
Familiarizing yourself with these codes helps guarantee that your installation meets legal requirements and minimizes potential hazards. Check with your local building department or a trusted electrician to get the latest updates on regulations specific to your region.
Pay attention to requirements about outlet placement, spacing, and the type of outlets needed in different areas of your home, such as kitchens or bathrooms.
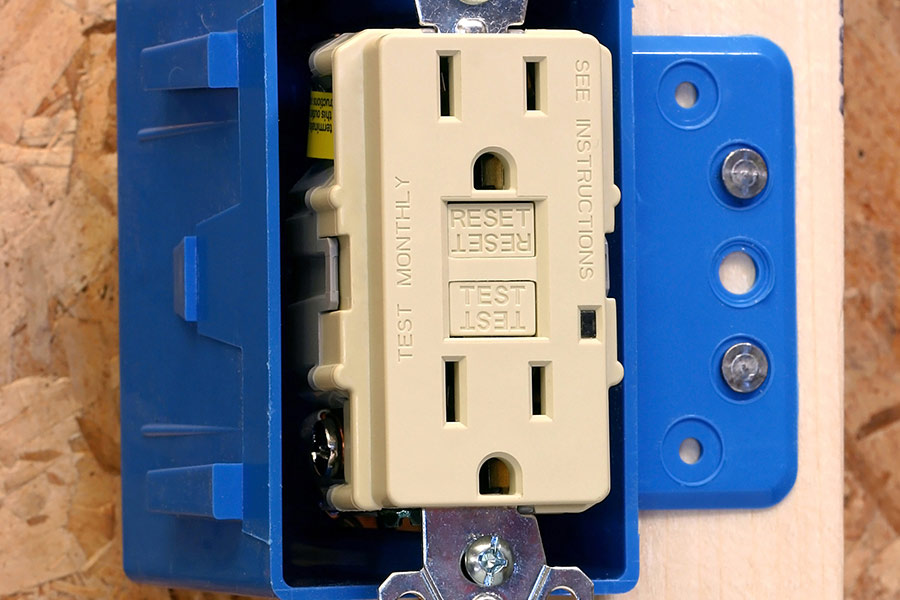
These rules often include GFCI outlets in wet locations and tamper-resistant designs for child safety. Ignoring these codes can lead to unsafe conditions and costly fines. Additionally, knowing the different types of electrical outlets available can help you choose the best options for your home.
Choosing the Right Outlet for Your Needs
Choosing the right outlet for your needs is vital for both safety and convenience. First, consider the type of devices you’ll be using. Standard outlets work for most appliances, but if you’re using high-powered tools or equipment, you might need a 20-amp outlet.
Ground Fault Circuit Interrupter (GFCI) outlets are important in wet areas like kitchens and bathrooms, as they protect against electrical shock. If you have outdoor spaces, think about weather-resistant outlets to withstand the elements.
Additionally, you might want to explore USB outlets for easy charging of devices without needing adapters. Smart outlets can also enhance your home’s functionality, allowing remote control of devices via smartphone apps.
Upgrading to modern outlets can also help ensure safe and efficient handling of increased electrical loads, especially in older homes where electrical system assessments are essential for safety.
Whatever your choice, verify the outlet’s specifications match your power needs and meet local codes. By carefully selecting the right outlet, you’ll enhance both safety and efficiency in your home.
Essential Tools and Materials for Installation
Installing an outlet requires a few essential tools and materials to guarantee the job is done safely and correctly. First, you’ll need a voltage tester to confirm the power is off before you start working.
A screwdriver set, including both flathead and Phillips, is essential for removing and securing outlet covers. You’ll also want wire strippers to prepare your electrical wires for connections.
Next, gather electrical tape to secure connections and prevent any exposed wiring. A drill can be useful if you’re installing a new outlet box, and don’t forget the outlet itself, which should match your needs.
Finally, having a level on hand guarantees your outlet is straight. With these tools and materials ready, you’ll be set for a smooth installation process. Always prioritize safety and double-check your supplies before beginning. Additionally, ensure that your electrical work complies with local codes to avoid any safety hazards.
Step-by-Step Installation Process
To successfully install an outlet, start by turning off the power at the circuit breaker to confirm safety throughout the process.
Next, gather your tools and materials, including a screwdriver, wire stripper, and the new outlet. Remove the existing outlet cover with a screwdriver, then unscrew the outlet from the electrical box.
Carefully disconnect the wires from the old outlet, noting their placement. Strip about half an inch of insulation from the ends of the wires if needed.
Connect the wires to the new outlet—black to brass, white to silver, and green or bare to the ground screw. Secure the outlet back into the box and replace the cover.
Finally, turn the power back on at the circuit breaker. Test the outlet with a voltage tester to confirm it’s working correctly. Installing a whole-house surge protector is also recommended to ensure comprehensive protection for all connected devices.
You’ve now successfully installed your new outlet!
Safety Tips to Keep in Mind
While working on an outlet installation, keeping safety as your top priority is essential. Start by turning off the power at the circuit breaker to avoid any shocks. Use a voltage tester to double-check that the wires aren’t live before you begin. Wear insulated gloves and safety goggles to protect yourself from accidental contact with electrical components.
Make certain to use the correct tools for the job, like a screwdriver and wire stripper, to guarantee efficient installation. When connecting wires, follow the color codes—black or red for hot, white for neutral, and green or bare for ground. Securely fasten all connections and ensure the outlet is firmly mounted to the wall.
Lastly, consider consulting a licensed electrician if you’re unsure about any steps. They can help you avoid potential hazards and guarantee a safe, effective installation, making sure you can enjoy your new outlet worry-free.

Conclusion
So, there you have it! Follow these tips, and you’ll be the proud owner of safely installed outlets, capable of powering everything from your coffee maker to that questionable lava lamp you just had to have. Remember, nothing says “I’m an adult” quite like knowing the difference between a GFCI and a standard outlet. Embrace your newfound electrical prowess—just don’t try to rewire your neighbor’s house on a whim! Safety first, superhero!